

AI Interior Design Renderings: What Designers Need to Know in 2026
A year ago, getting a photorealistic render of a client's living room meant one of two things: hours in a dedicated render software, or a fee to a specialist 3D visualiser. Both took days. Both cost money. Neither was fast enough for early-stage client conversations.
AI rendering has changed that equation. Tools that generate photorealistic images from sketches, CAD models, or room photos in under 30 seconds now exist — and they're genuinely good. Good enough to use in client presentations. Good enough to replace certain stages of the traditional visualisation workflow entirely.
But not all renderings are created equal. And not every use case is suited to AI. This guide cuts through the noise — what AI rendering actually is, where it performs well, where it still falls short, and how to build it into your workflow intelligently.

AI rendering isn't replacing the design process. It's compressing the visualisation part of it — which changes how quickly clients can see and respond to your ideas.
Traditional Rendering vs. AI Rendering: The Honest Comparison
Before deciding how to integrate AI rendering into your workflow, it helps to understand exactly what's changed — and what hasn't.
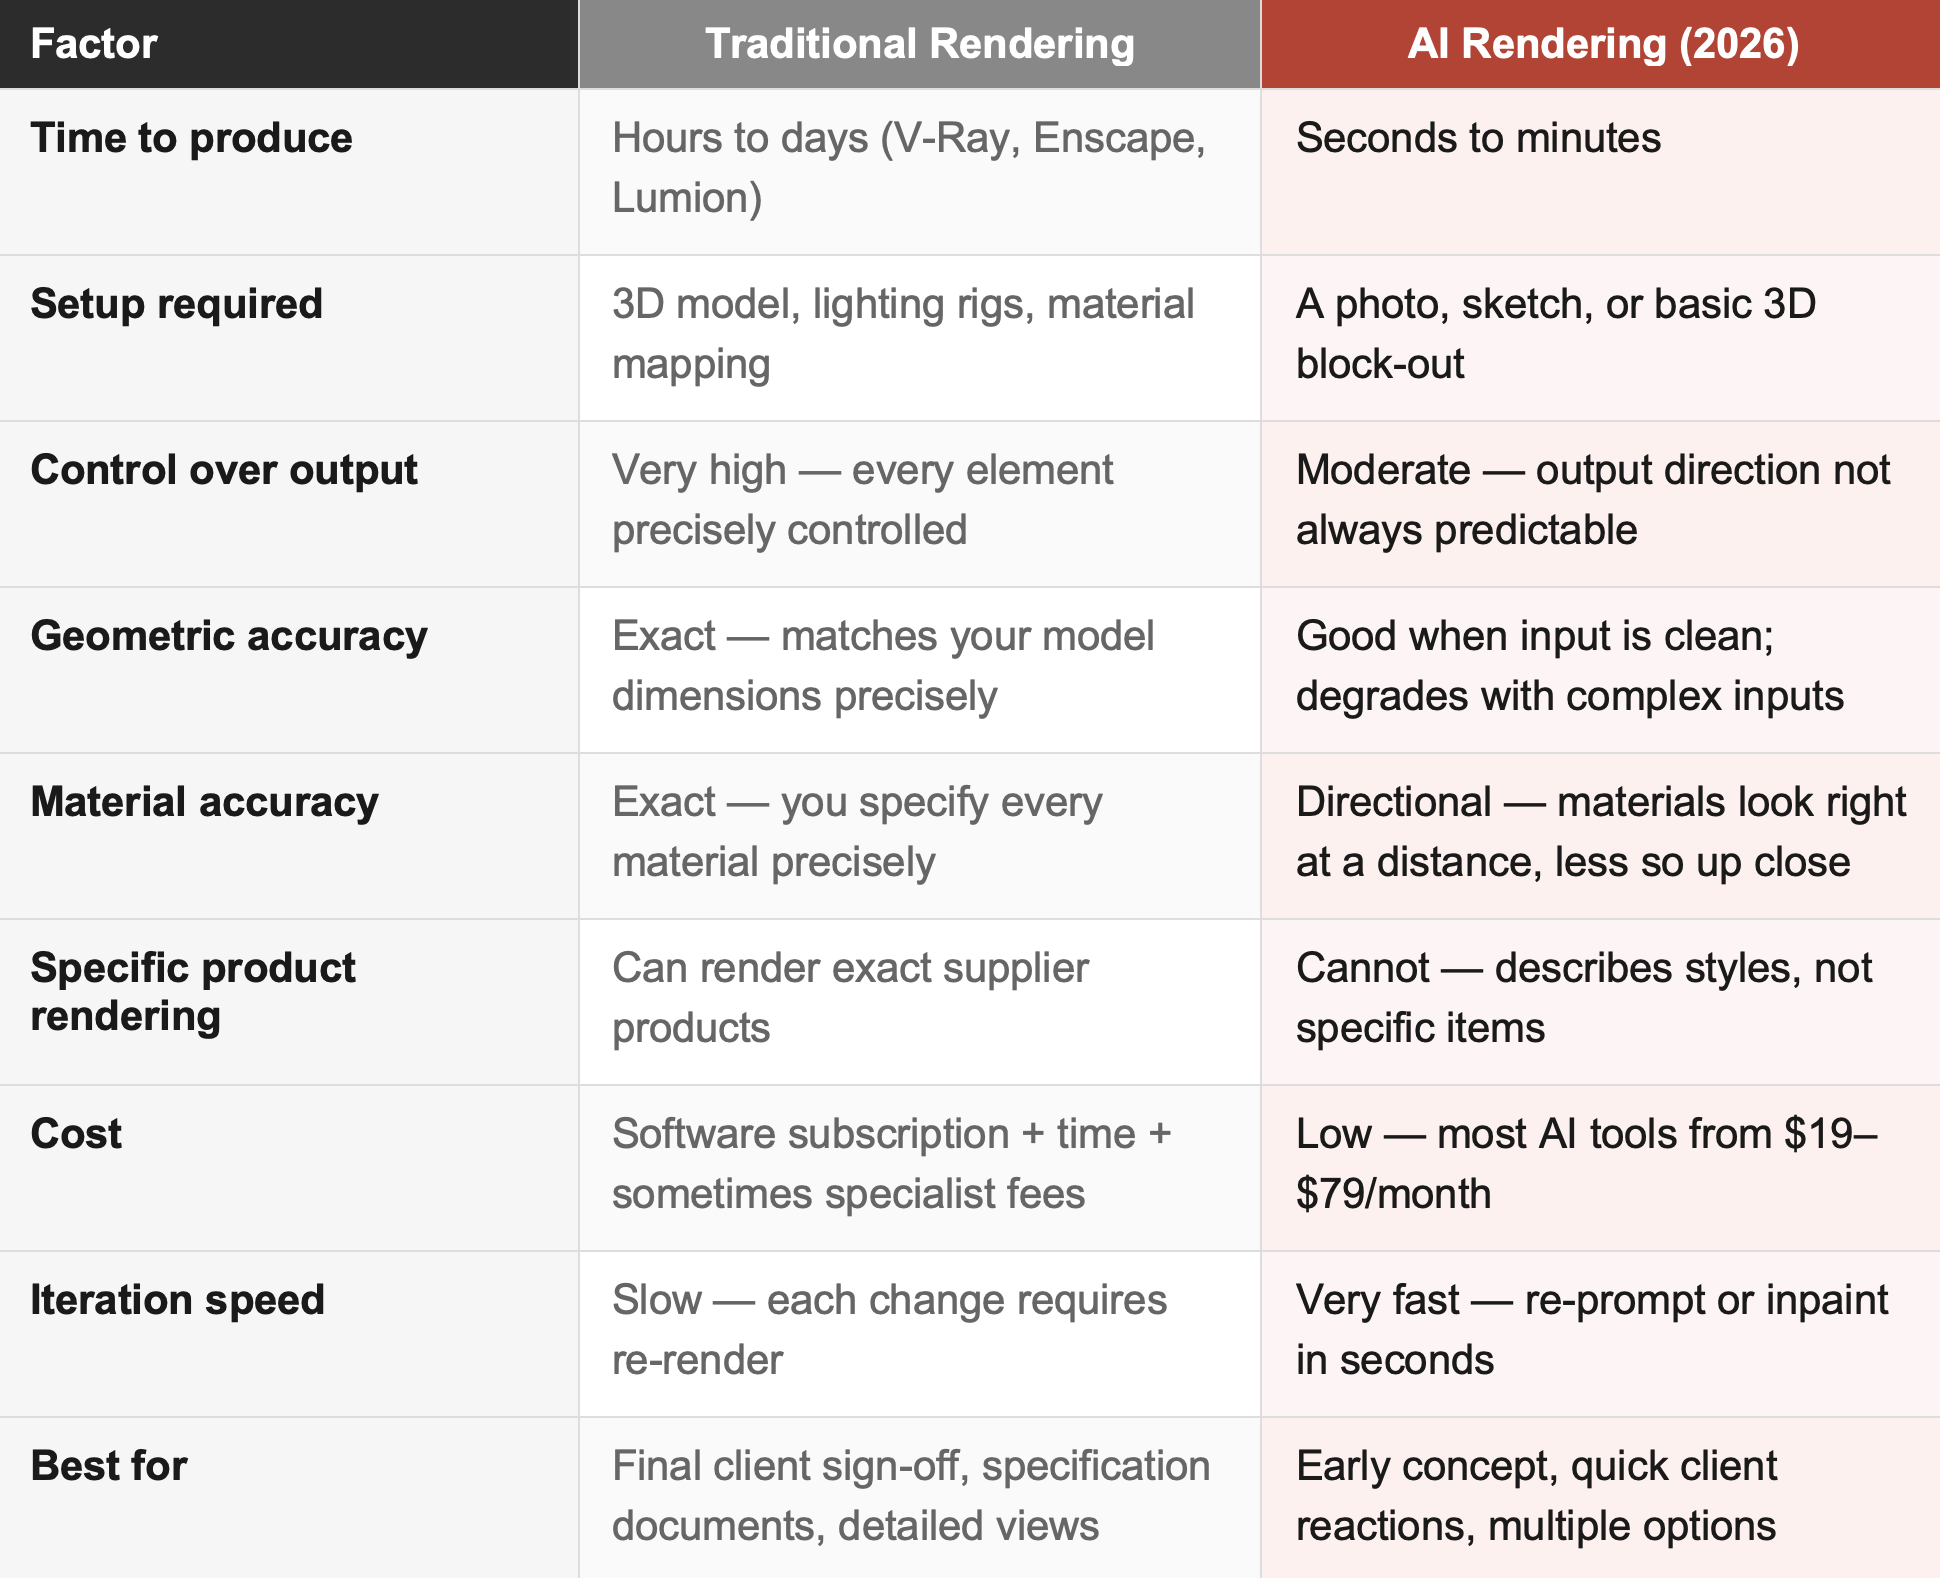
The key insight from this table: AI rendering excels at the early stages of a project — getting fast reactions, testing directions, showing clients something to respond to before you've committed to the full technical process. Traditional rendering is still the right tool for detailed, sign-off-level visualisations where precision matters.
How AI Rendering Actually Works
Understanding the mechanics helps you understand both the capabilities and the limitations — and write better inputs as a result.
Text-to-image rendering
Tools like Midjourney generate images entirely from text prompts. They have no spatial understanding of a real room — they generate based on patterns in their training data. The output can be stunning but is essentially 'a room that looks like this description' rather than 'your room.' Useful for concept direction; not useful for spatial accuracy.
Image-to-image rendering (room photo input)
Tools like InteriorAI, HomeDesignsAI, and Rendair take a photo of an existing room and transform it according to a style direction. These tools understand the basic geometry of the space — walls, floor, ceiling proportions — and apply a redesign on top of it. The output is more spatially relevant than text-to-image, though complex room shapes can confuse the AI.
Sketch or CAD-to-render
The most professionally controlled approach. Tools like Rendair, MyArchitectAI, and SketchUp Diffusion take a 3D block-out or CAD drawing as input and produce a photorealistic render from it. The geometry is preserved — furniture placement and proportions are accurate — while the AI handles lighting, texturing, and atmosphere. This is the closest to traditional rendering in terms of output reliability.
📐 The Better the Input, the Better the Output
This is the principle that separates useful AI renders from generic ones. A clean SketchUp block-out with clearly defined geometry will produce a significantly more accurate and useful render than a rough sketch or a photo of a cluttered existing room. Time spent cleaning up your input model is time saved iterating on poor output.
Where to Use AI Rendering in Your Workflow
Not every stage of a project benefits equally from AI rendering. Here's a practical guide to where it adds the most value — and where traditional methods still win.
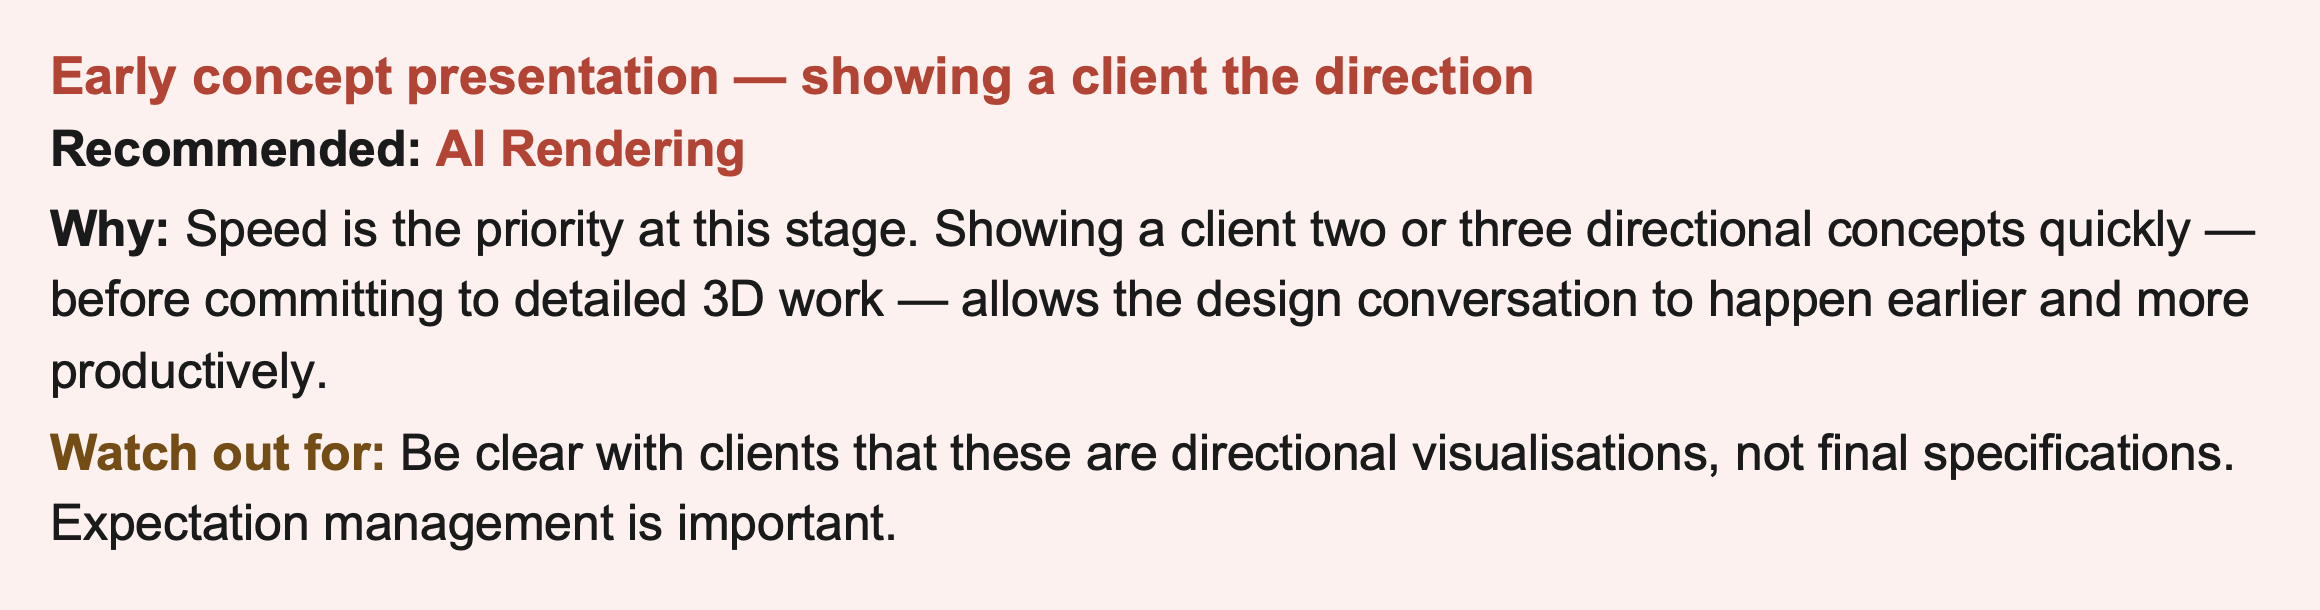




The Three Workflows: From Quick to Precise
Depending on your project stage and what you need the render for, here are the three practical workflows — ordered from fastest to most controlled.
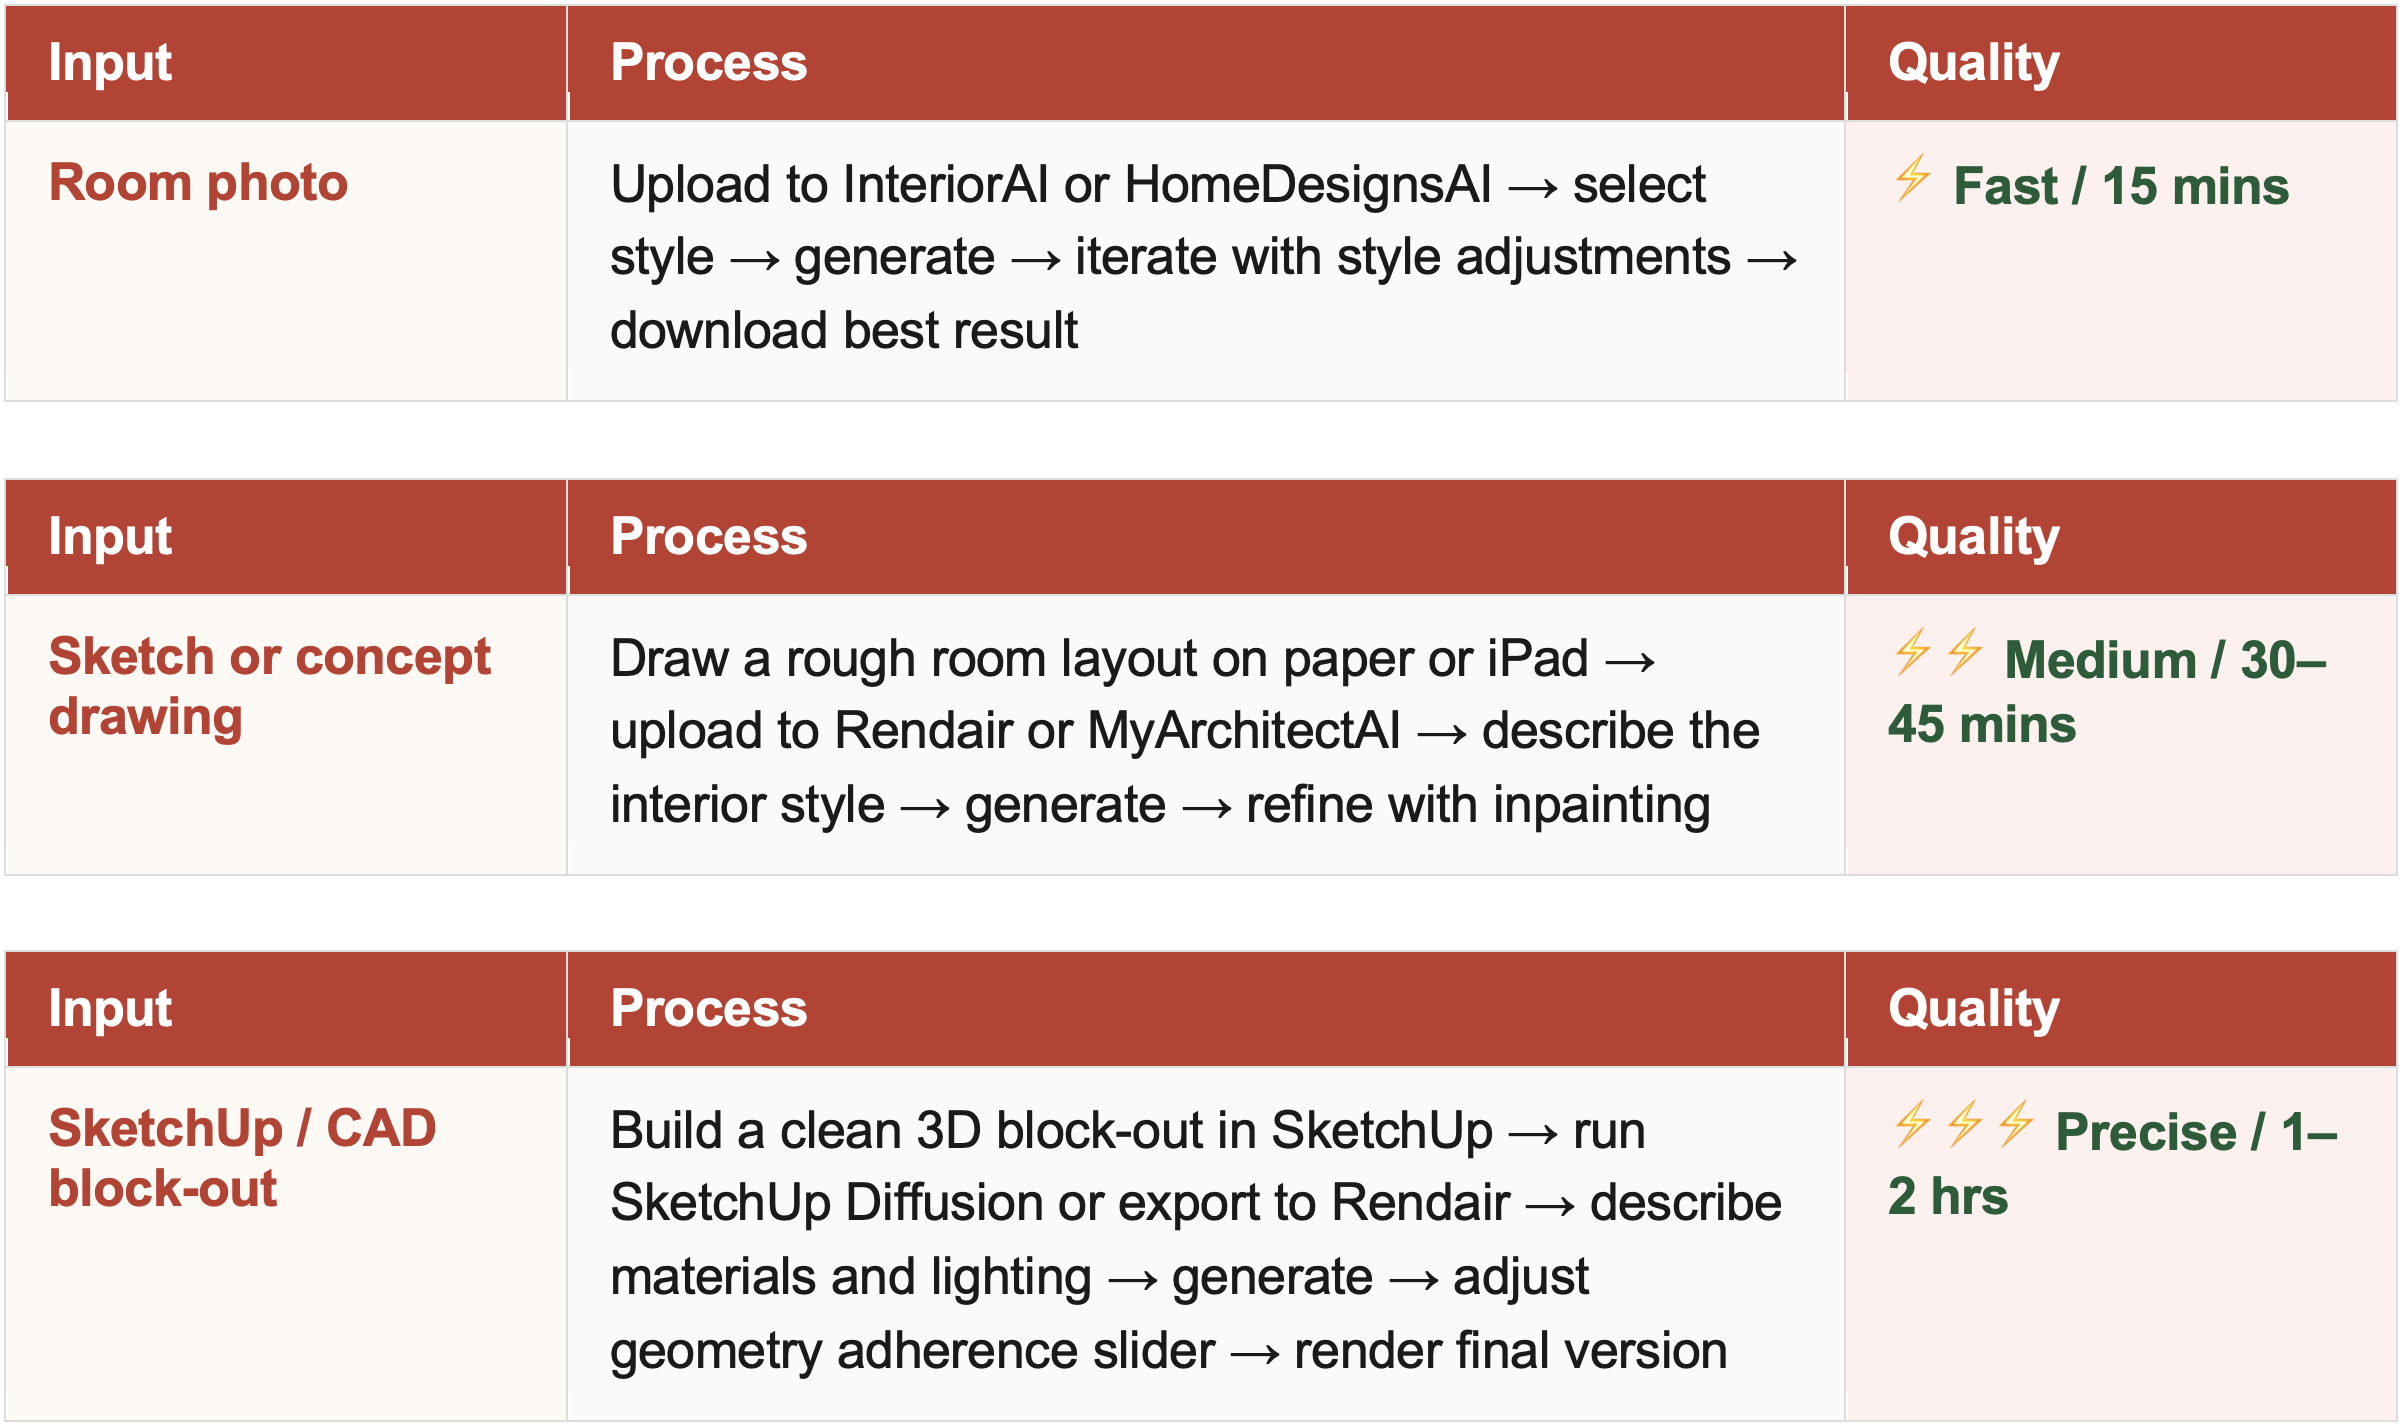
The trade-off is always speed vs. control. For early client conversations, the first workflow is often all you need. For detailed concept presentations, the third workflow produces output genuinely comparable to a traditional specialist render — in a fraction of the time.
The Limitations: What AI Still Gets Wrong
Using AI rendering well means knowing what it can't reliably do — so you don't present clients with results that undermine your credibility.
Close-up material detail
Marble veining, fabric texture, tile grout lines, and wood grain all look convincing at a distance but can look artificial in close-up renders. Avoid zooming into materials in AI-generated images and avoid using them as material sign-off references.
Specific product rendering
You cannot tell an AI tool 'render the Vipp Shelter sofa by Cecilia Maneschi.' It will generate something that looks like the style you describe, not the specific product. If a client needs to approve a specific piece of furniture, use a traditional render or a product photo in a manual composition.
Complex spatial geometry
Rooms with coffered ceilings, curved walls, split-level floors, or unusual proportions often confuse AI rendering tools, producing spatial distortions or adding architectural elements that don't exist. Simpler, more orthogonal spaces render more accurately.
Precise lighting positioning
AI tools make lighting decisions aesthetically rather than technically. The output may look beautiful but not accurately reflect where your specified luminaires are positioned or how a specific lighting scheme will perform. Use traditional render software for lighting specification sign-off.
Use AI rendering to start the conversation with clients. Use precise rendering to finish it.
Managing Client Expectations Around AI Renders
One of the more nuanced challenges of using AI in client presentations is managing the gap between what a render looks like and what the finished space will look like. This gap exists in traditional rendering too — but AI rendering's speed and accessibility means clients sometimes see renders earlier and more frequently, amplifying the risk.
A few practices that help:
Label AI-generated visuals clearly — 'Concept direction — not to specification' at the bottom of every AI render in a presentation
Pair AI renders with a material schedule — so clients understand what specific products are being proposed alongside the atmospheric visual
Use the render to prompt conversation, not close it — 'Does this direction feel right? What would you change?' rather than 'Here's what your room will look like'
Follow up with traditional renders before sign-off — at the point where clients are approving final specifications, make sure the visual they're approving from is accurate
🖼️ A Simple Labelling Convention
Add a footer to every AI-generated image in your presentations: 'Visualisation concept — for direction only. Final specification to follow.' This one line removes 90% of the expectation management problems that come with AI rendering — it primes clients to react to the direction rather than approve the detail.

The quality of your AI render is only as good as the input you give it. Chique Nest's professionally drawn AutoCAD block libraries and accurate furniture blocks give you the clean, precise drawings that AI rendering tools need to produce results worth showing clients.

Stop redrawing the same elements on every project. 5,000+ professional AutoCAD blocks — every category, one download, use forever.
💡__ Everything You Need to Draft Like a Pro
Why waste time piecing together design files when you can get every block, every category, all in one place?
This exclusive bundle includes over 5,000+ AutoCAD blocks across furniture, cabinetry, kitchen, ISO models, elevations, sections, and more — curated specifically for interior designers, architects, and CAD professionals.
Whether you’re building presentations, technical drawings, or floorplans, this bundle gives you unmatched speed, clarity, and flexibility — and saves you hundreds in the process.
🧩__ What’s Inside the Bundle:
✅ 1,000+ Premium Dynamic AutoCAD Blocks
✅ 1,000+ Furniture Elevation Blocks
✅ 1,500+ All Purpose Furniture Blocks
✅ 200+ Branded Living Room Furniture Blocks
✅ 1,000+ Living Room Furniture Blocks
✅ 1,000+ Cabinetry Elevations & Sections
✅ 500+ Kitchen ISO, Floorplans, Elevations & Details
That’s 7 full libraries bundled into one. Valued at over $250+, available for only $119.99.
Trusted by interior designers and architects in 43 countries.
📂__ File Format & Compatibility:
Provided in .dwg format
Fully compatible with AutoCAD 2013 and newer
Works on both Windows and Mac systems
Created in metric units — also fully usable in imperial projects with the correct import settings
⚡__ Instant Access. One-Time Purchase. Use Forever.
✔️ Instant digital download upon purchase
✔️ No recurring fees — one-time payment for lifetime use
✔️ All sales are final (due to the digital nature of the product)
❗ This is not an AutoCAD course — blocks only
🚀__ Why Buy Now?
Buying each library separately would cost you over $250 — this bundle saves you more than 50%.
Get every file you’ll ever need in one purchase, and design smarter, faster, and better — every single time.