
AutoCAD Layers Explained: How to Set Up Your Drawing Files Like a Pro
If you've ever opened someone else's AutoCAD file and felt like you'd walked into a room where nothing was labelled and the lights were off — you already understand why layers matter.
Layers are the backbone of every professional AutoCAD drawing. They control what you see, what you print, and how quickly you can work. Yet for many interior designers — especially those who are self-taught or still building their CAD skills — layers are one of the most overlooked parts of the workflow.
In this guide, we're breaking it all down: what layers are, why they matter, how to name and colour-code them, and exactly how to set up your drawing files so that every project you deliver looks polished, professional, and easy to navigate.

Whether you're just getting started with AutoCAD or looking to finally fix the messy file habits you've been putting up with — this one is for you.
What Are AutoCAD Layers — And Why Should You Care?
Think of AutoCAD layers like the transparent sheets used in old-school hand drafting. Each sheet holds a different type of information — walls on one, furniture on another, lighting on another — and when you stack them together, you get the complete drawing.
In AutoCAD, layers work the same way. They allow you to:
• Separate different types of information within a single drawing file
• Turn elements on and off without deleting them
• Control the visual appearance of different drawing elements independently
• Print specific parts of a drawing without printing everything
• Share files with contractors, clients, or collaborators that are easy to read and navigate
⚠️ The Real Cost of Bad Layer Management
Designers who skip proper layer setup spend hours hunting for objects, accidentally editing the wrong elements, or sending out drawings that look unprofessional. Time is money — and messy CAD files cost you both.
Find the Best AutoCAD Blocks Library for your projects
The Anatomy of a Layer: What You Can Control
Before we get into naming conventions and setup, it helps to understand every property a layer can have. Each layer in AutoCAD controls:
1. Name
The identifier for the layer. A good name tells you instantly what's on it. A bad name (like 'Layer 7' or 'asdfgh') means you'll be second-guessing yourself forever.
2. Colour
Assigning colours to layers makes your drawing instantly readable. It also controls how objects print if you're using a colour-dependent plot style (CTB file). Use colour consistently across all your projects for maximum efficiency.
3. Lineweight
Different elements need different visual weight. Walls should read heavier than furniture outlines. Dimensions should be lighter than structural elements. Lineweight is your visual hierarchy tool.
4. Linetype
Solid, dashed, dotted, centre lines — linetype helps communicate information without text. Hidden elements, property boundaries, and grid lines all use specific linetypes to convey meaning.
5. On / Off
Turning a layer off hides it from view but keeps it in the file. Useful when you want a cleaner working view without losing data.
6. Freeze / Thaw
Freezing a layer goes one step further than turning it off — AutoCAD won't even process frozen layers when regenerating the drawing. On complex files, freezing unused layers can noticeably speed up your workflow.
7. Lock / Unlock
Locking a layer means objects on it are visible but cannot be selected or edited. Perfect for base plans or reference drawings you don't want to accidentally modify.
8. Plot / No-Plot
You can mark specific layers as non-plotting. Great for notes to yourself, reference grids, or working guides that should never appear on the final printed drawing.
Pro tip: Always set your notes and working reference layers to 'No Plot' so they can never accidentally appear on client deliverables — no matter who prints the file.
Layer Naming Conventions: The System That Saves You Hours
There's no single 'correct' naming system — but there is a principle that all good systems share: your layer names should be instantly readable by anyone who opens the file, including a version of you who hasn't touched it in six months.
Here are the most common approaches used by professional interior designers:
Option 1: Descriptive Plain English (Best for Solo Designers)
Simple, human-readable names that describe exactly what's on the layer. No codes, no abbreviations. Great for designers working alone or with a small team.
WALLS
FURNITURE
DOORS-WINDOWS
FLOORING
CEILING PLAN
ELECTRICAL
DIMENSIONS
TEXT-NOTES
HATCH-FILLS
TITLE BLOCK
Option 2: Prefix-Based System (Best for Larger Teams or Studios)
Using consistent prefixes groups related layers together in the Layer Manager and makes files predictable across an entire team or practice.
A-WALL (Architectural - Walls)
A-DOOR (Architectural - Doors)
F-FURN (Furniture)
F-FIXD (Fixed Furniture / Built-ins)
E-LITE (Electrical - Lighting)
E-SOCK (Electrical - Sockets/Outlets)
D-DIMS (Dimensions)
D-TEXT (Text/Annotations)
Golden Rules for Layer Naming
Never leave layers called 'Layer 1', 'Layer 2', etc.
Be consistent — use the same names across every project file
Avoid spaces in layer names — use hyphens or underscores instead
Keep names short but meaningful — 'EXT-WALLS' beats 'EXTERIOR PERIMETER WALLS'
Create a layer template file so you never have to rebuild from scratch
The Essential Layer Setup for Interior Design Projects
Use this as your starting point for every project. Adjust colours and lineweights to match your preferred plot style — but keep the structure consistent.
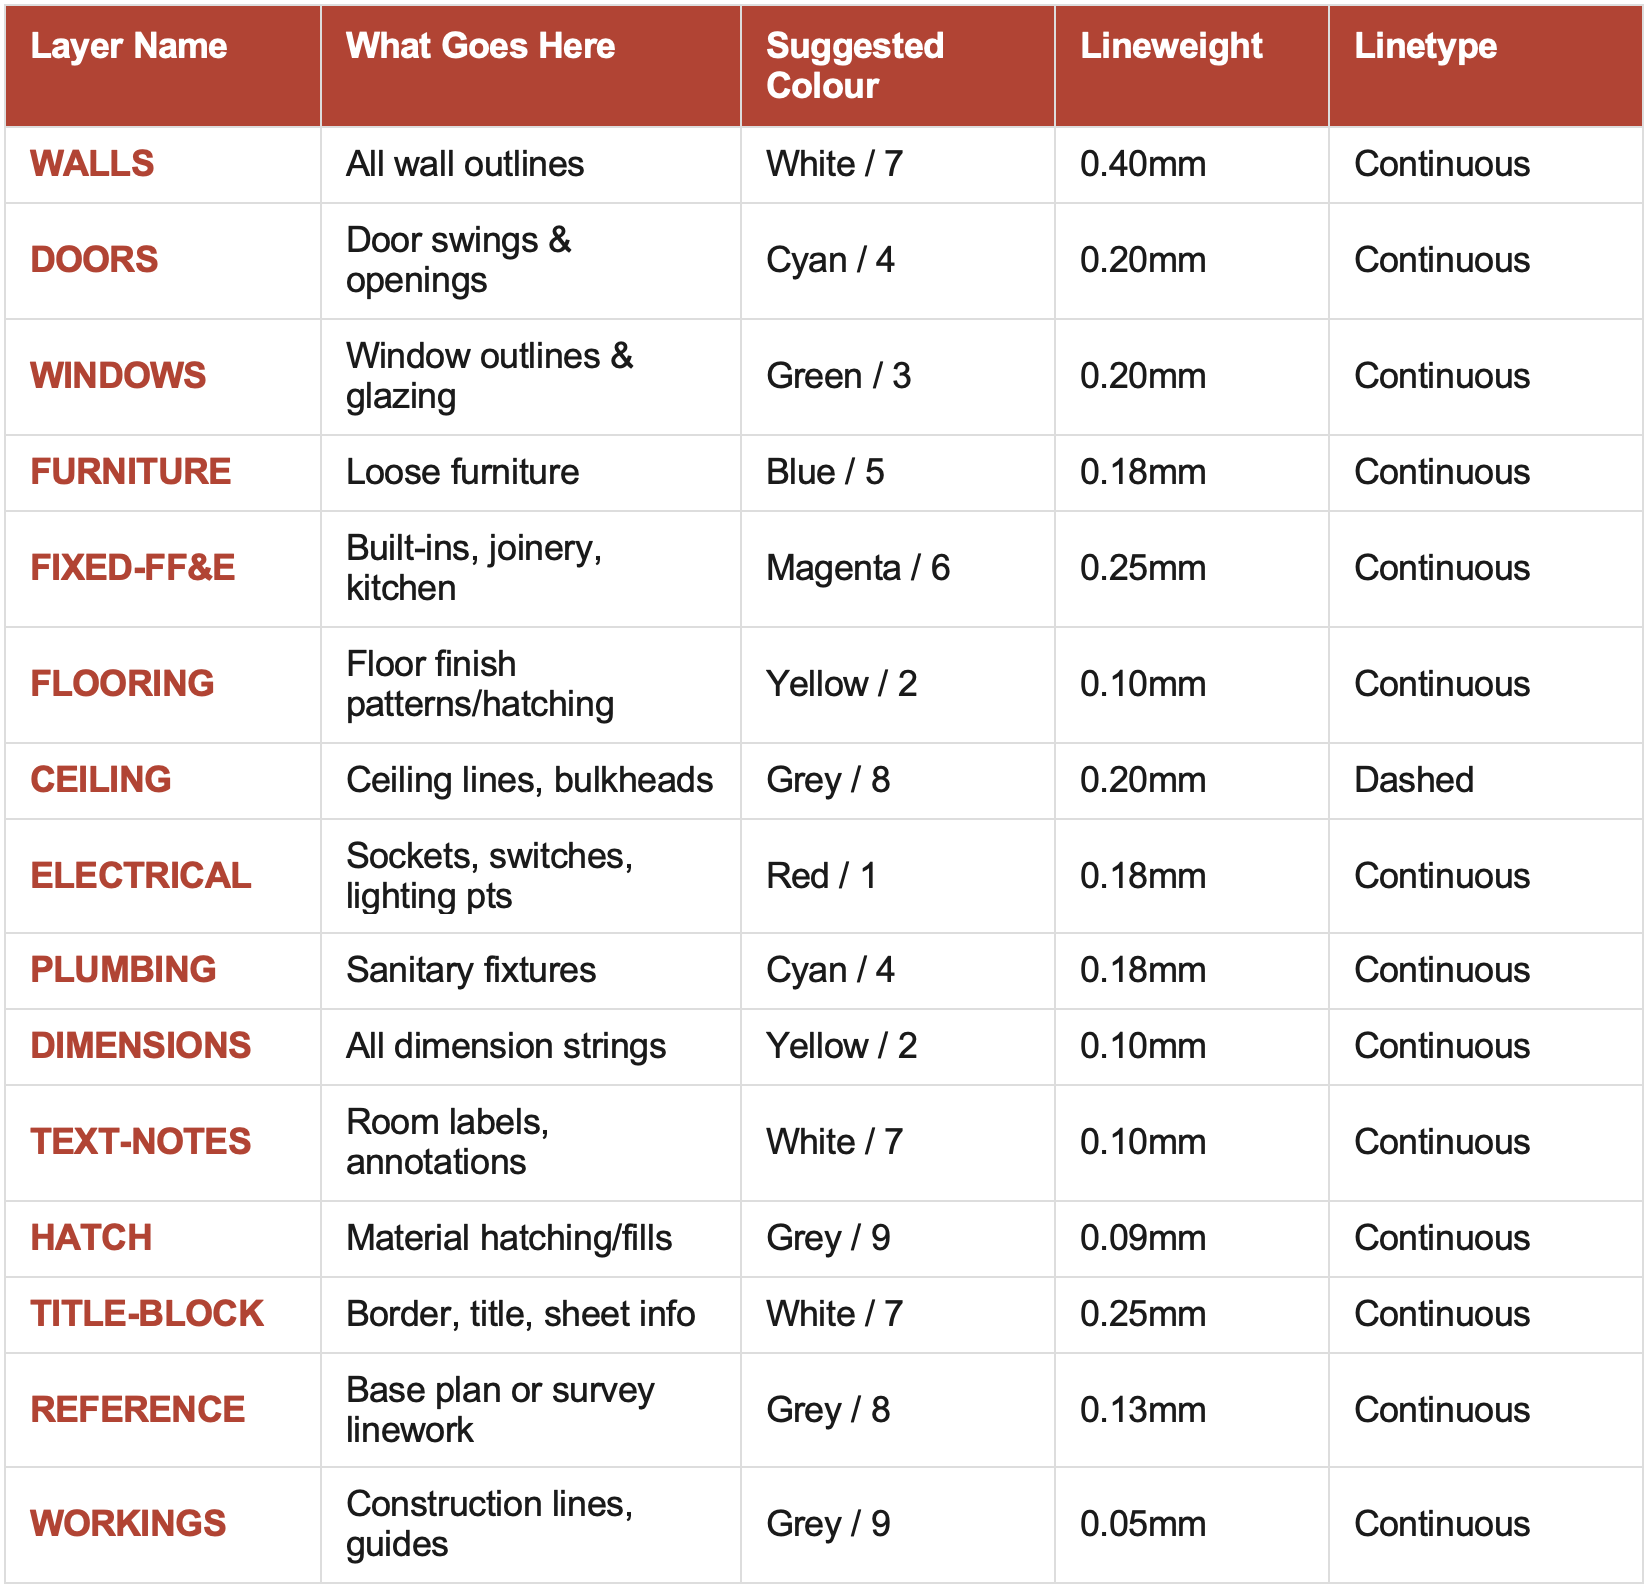
Note: The 'REFERENCE' and 'WORKINGS' layers should be set to No-Plot in your Layer Manager.


How to Set Up a Layer Template (So You Never Start From Scratch)
One of the highest-value habits you can build as a designer is creating a drawing template — a .DWT file — that comes pre-loaded with your full layer setup, title block, text styles, dimension styles, and plot settings.
Every new project starts from this template. Every drawing you produce looks consistent. Every file you send is professional out of the box.
Here's How to Create Your Layer Template:
Open a blank AutoCAD drawing file
Open the Layer Manager (type LA and press Enter)
Create each layer from the reference table above — set name, colour, lineweight, and linetype
Set 'REFERENCE' and 'WORKINGS' to No-Plot
Add your title block, text styles, and dimension styles
Go to File > Save As > Drawing Template (.DWT)
Name it something like 'ChiqueNest_Template_v1.dwt' and save it in a reliable location
🔄 Keep It Updated
Treat your template as a living document. Every time you find yourself creating a new layer repeatedly across projects, add it to the template. Every time a layer turns out to be unnecessary, remove it. Review and update your template every 6 months.
Common Layer Mistakes (And How to Fix Them)
Even experienced designers fall into these habits. Here's what to watch out for:
❌ Drawing Everything on Layer 0
Layer 0 is AutoCAD's default layer and has special behaviour when used inside blocks. It should never be used as a general working layer. If you're drawing walls on Layer 0, stop immediately — create a dedicated WALLS layer and move everything across using the Properties panel.
❌ Using the 'Defpoints' Layer for Real Content
Defpoints is an automatically created layer that never plots. It exists only for associative dimension points. If you accidentally draw anything on Defpoints, it will never print — which can lead to missing elements in your deliverables.
❌ Overriding Layer Properties at the Object Level
When an object's colour, lineweight, or linetype is set to anything other than 'ByLayer', it breaks the layer system. You lose the ability to control that object's appearance by changing the layer. Always set object properties to ByLayer and control everything through the layer itself.
❌ Inconsistent Layer Names Across Projects
If you name it 'FURNITURE' on one project and 'FURN' on the next, you'll never be able to use Layer States, xrefs, or templates efficiently. Pick a system, document it, and stick to it.
❌ Too Many Layers
More is not better. A drawing with 80 layers is harder to manage than one with 15 well-defined layers. If you find yourself creating a new layer for every single object type, consolidate. The goal is clarity, not granularity.
Layer States: The Hidden Feature That Will Change Your Workflow
If you're not using Layer States, you're missing one of AutoCAD's most powerful productivity tools.
A Layer State is a saved snapshot of your layer configuration — which layers are on, off, frozen, locked, and what their properties are. You can create multiple Layer States for a single drawing and switch between them instantly.
Here's how interior designers use them in practice:
'Furniture Layout' state — furniture, walls, and dimensions on; everything else off
'Electrical Plan' state — electrical layer on; furniture and flooring off
'Floor Finishes' state — flooring, hatch, and room labels on; everything else off
'Client Presentation' state — clean view with no dimensions, notes, or workings visible
'For Print' state — all plotted layers on, no-plot layers verified off
To access Layer States: open the Layer Manager, click the 'Layer States Manager' button (or type LAYERSTATE in the command line), and save your current configuration with a descriptive name.
Layer States are especially powerful when you're managing multiple drawing sheets from a single model space file. Switch states, plot, switch again, plot — your entire drawing set in minutes.
A Note on Colour-Dependent vs. Named Plot Styles
When you set up layers with colours, those colours interact with your plot style to determine how things print. There are two systems in AutoCAD:
CTB Files (Colour-Dependent Plot Styles)
The traditional system. Each colour number (1–255) maps to a specific print output — usually a lineweight. Red (colour 1) might print at 0.18mm, white (colour 7) at 0.40mm. If you're using a CTB-based workflow, your layer colours become your lineweight controls.
STB Files (Named Plot Styles)
The newer system. Lineweight is assigned to layers directly, not through colour. Colours are purely visual. Most modern interior design practices have moved toward STB or simply using 'Display Lineweight' in model space.
📋 What Should You Use?
For most independent interior designers, the simplest approach is to assign lineweights directly to your layers (as shown in the table above) and use an STB or monochrome CTB file that prints everything in black at the defined lineweight. This gives you full visual colour in your working file while producing clean, professional black-and-white prints.
Bottom Line
AutoCAD layers aren't the most glamorous part of being an interior designer. But the designers who master their layer setup are the ones who work faster, deliver cleaner drawings, and build a reputation for professionalism that clients and contractors notice.
Start with the layer table in this post. Build your template. Set your properties to ByLayer. Lock your base plans. Save Layer States for each drawing type you produce regularly.
Do that once — properly — and it will pay you back on every single project for the rest of your career.

Chique Nest's AutoCAD Blocks Library gives you a professionally built, ready-to-use collection of blocks for residential and commercial interior design projects — fully organised and compatible with any layer setup.